A serious impediment to the use of lighter-weight, higher-strength materials in automobile manufacturing is the relative lack of understanding about how these materials respond to the complex forming operations that go into shaping a blank of metal into automobile body parts. One of the most vexing and costly problems is “springback” — the tendency of sheet metal to lose some of its shape when it is removed from the die. Springback is very pronounced with two of the likeliest candidates for weight reduction: high-strength steel and aluminum alloys, than it is with standard steel. Unless it is well managed and taken into account when the dies are designed, it leads to parts that are ill-fitting and deviate excessively from design intent.
American auto manufacturers, through the Springback Project of the U S C A R consortium, are engaged in a major effort to predict springback by means of sophisticated finite element modeling (“F E M”).
U S C A R is the umbrella organization of Daimler Chrysler, Ford and General Motors, which was formed in 1992 to further strengthen the technology base of the domestic auto industry through cooperative, pre-competitive research.
However, the accuracy of predictions of large strain plasticity under complex load histories, such as those applied during stamping processes, is uncertain because of incomplete validation of the F E M programs. Surprisingly, calculated residual stress, one of the key mechanical properties predicted by the state-of-the-art F E M codes, had not been compared with experimental measurements. The present work is the first comprehensive effort to determine the residual stresses of interest.
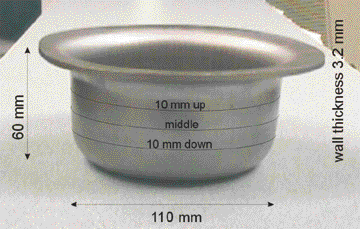
Diffraction provides a powerful means of very accurately measuring microstructure, strains (from which stresses are determined) and mechanical behavior in a way not possible with other techniques. More importantly, diffraction facilities available to the N C N R include neutron diffraction, laboratory x-ray diffraction and synchrotron x-ray diffraction (at Argonne’s Advanced Photon Source). These constitute the full spectrum of diffraction probes of residual stress and microstructure for surface, sub-surface and bulk specimens. The test specimens employed for this study were two deep-drawn “Demeri” cups: one, thin-walled (approximately 1 milli meter) 6 0 2 2, T 4 aluminum; the second, thicker-walled (3.2 milli meter) steel. The latter is shown in Figure 1.

| Figure 1. The deep-drawn steel cup. The aluminum cup was similar, except for wall thickness. |
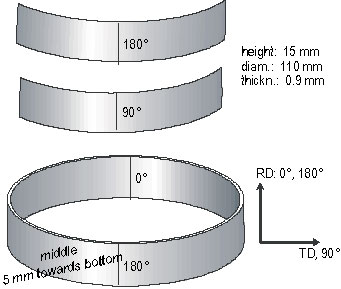
The objective of this project was to determine the residual stresses in the “simple” model specimens formed similarly to stamped auto parts. Modelers in the U S C A R consortium would use F E M to predict the stress distributions to validate their codes. At this time, the modeling part of the project is still in progress. Two distinct experimental studies were performed. The first utilized synchrotron x-rays to determine the stress distribution in a ring and pieces (Figure 2) cut from the aluminum cup (which except for wall thickness, was initially like the steel cup shown in Figure 1). The critical point of this study is to determine the stress distribution in the ring and, ultimately, whether the F E M could predict it. Directly related to this was how the measured stress distribution compared with the simple linear depth dependence used in analytical calculations to predict the opening of the ring when cut.

| Figure 2. Pieces cut from the aluminum cup and examined by synchrotron x-rays. |
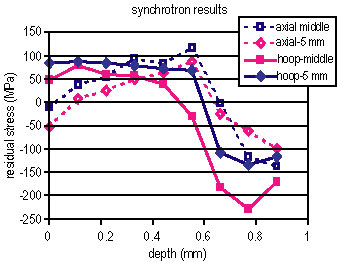
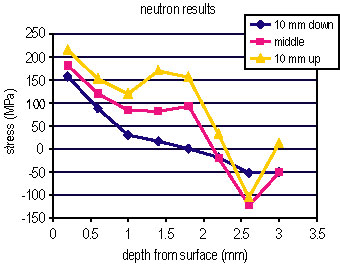
The residual stresses determined from the x-ray diffraction measurements are shown in part in Figure 3. Representative neutron diffraction results for the steel cup are shown in Figure 4.

| Figure 3. Axial and hoop stresses for the 0.9 milli meter thick aluminum cup as determined by synchrotron x-rays. |

| Figure 4. Hoop stresses as a function of depth in the 3.2 milli meter thick steel cup, as determined by neutron diffraction. |
The more complete results shown for the aluminum ring, the first such measurements on deep-drawn cups, satisfy both symmetry and stress balance requirements. However, the stresses vary around the circumference and in the axial direction, and differ strongly from ideal bending stresses. So even for the “simple” model system, the plastic deformation process and the resultant stresses are very complex.
In summary, these results provide the first through-thickness stress distributions by which springback model predictions of residual stress can be tested. Furthermore, synchrotron radiation and neutrons are the only non-destructive methods that are able to provide the necessary accuracy and spatial resolution needed to obtain these results. Finally, successful modeling of springback requires successful prediction of these stress distributions.
References
T. Gnaeupel-Herold, H. J. Prask, R. J. Fields, T. J. Foecke, M. F. Shi, and U. Lienert, submitted to Mater. Sci. Eng. A
Authors
T. Gnäupel-Herold and H. Prask
NIST Center for Neutron Research
National Institute of Standards and Technology
Gaithersburg, MD 20899-8562
R. Fields
Metallurgy Division
National Institute of Standards and Technology
Gaithersburg, MD 20899-8553
D. Haeffner
Advanced Photon Source
Argonne National Laboratory
Argonne, IL 60439
E. Chu
Alcoa Technical Center
Alcoa Center, PA 15069-0001
Back to FY2002 HTML main page
Go to next article
To view all symbols correctly, please download Internet Explorer 6 or Netscape 7.1